If you tend to scan a lot of stuff, these tips might be really helpful. A while ago, I had to scan a whole book, and I realized that the default scan settings just weren't good enough. Especially for pictures and mathematical notations. They just don't seem to come out properly. So if you would like to tweak your scanner settings to create better quality scans then read on...
Turn off Auto Cropping
The number one problem I find that my scanner (notice I say my scanner, which might mean that such problems might be confined only to the scanner I have) does not seem to do a good job if I simply set the mode for scanning. Nor does it scan everything I place on the flat bed, it seems to crop things out, thinking it to be unimportant. Not only it this super annoying, but it also wastes a lot of time, so here are a couple of settings (applying these settings will of course, differ depending on your scanner, so you'll have to check the manual)
In my case, it was opening up the set-up utility, going to advanced settings for scans and selecting the area to be scanned. Since most of the stuff I scan in letter format, I usually keep it on letter.

Choosing the right DPI
Usually, scanner do not scan at a high DPI, unless you specify it to. However, unless you're really running low on hard disk space, I recommend that you should bump up the DPI settings to at least 300 DPI. Yes, the time it takes to scan something will take much longer, but the quality will be much better. Of course, once you have the actual scans you can do whatever you want with them, even reduce the quality if need be. Plus, if you were to print out (especially if you were to create big size posters) these picture or documents that were scanned at a high DPI, the image quality of the overall print will be significantly better. So, if you have the option, make sure you scan at 300 or the highest DPI possible.

Always scan everything in colour
Why would you scan things in black and white, if you're transferring the data to your computer instead of directly printing it out. Scanning in colour gives you the option to do whatever you want with it once you've scanned it. I also find that a lot of detail is ignored by the scanner when it scans simply in black & white. If you want to be on the safe side, I'd say colour is the way to go.
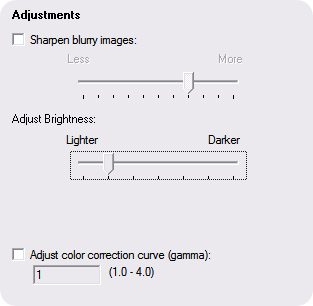
Scanning dark text on a light background
Often, I find that scans of light text on a dark background are less than satisfactory. Especially if the light text is white and the dark background is black. It seems that most scanners have the options of specifying the brightness of the image being scanned, so in such cases it is best to bump up the brightness a little bit. It might help in getting a better result.
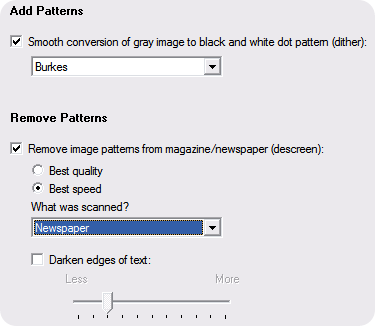
Remove Patterns on Paper
Another great features that scanners have is to automatically, although not accurately, detect any unwanted patterns in the background of the item being scanned. For example, if the paper you are scanning is a bit crinkled, it will automatically try to remove the marks on the paper, resulting in a better scan overall.
Following the tips above when you scan something will assuredly improve the quality of scans.
Got a question, tip or comment? Send them to beyondteck+question@gmail.com and we'll try to answer it in a blog post!
No comments:
Post a Comment