Showing posts with label Registry. Show all posts

Thursday, 3 September 2009

Fix the “programs still need to close” problem in Windows 7

8 Comments
ProgramsStillNeedtoClose
One sad thing about Windows 7 is that sometimes, it gets a little confused. Especially if you have applications like Norton or any similar anti-virus programs (which Windows 7 still needs by the way) installed.  And often, when you try to restart or shut down your progam, you’ll get a window that says:

Programs still need to close – Force Restart or Cancel

Of course, the easy way out of this would be just to click Force Restart all the time. Plus, if you see an open Microsoft Word document that you forgot to save, this screen will no doubt remind you of something you’d better save before restarting. But that won’t help when you don’t have any programs that you can save data in.
The ideal solution in such cases, in my opinion, would be to wait for a couple of seconds till the notorious programs close and then restart. But if you’re running something like Norton that doesn’t seem to be the case.

Tuesday, 23 December 2008

The real way to clean up your Windows registry and make Windows Faster!

6 Comments

image Have you ever heard of those applications that promise you that they can clean up your registry in only 1 click and make your computer run faster with only 1 use. Well, let me tell you why these applications don’t work and the real way to keep your registry clean and make sure your system works smoothly.

Why do those registry cleaners don’t work?

Well, the truth is, that the way the Windows registry is built, it’s impossible to find out which keys to delete and which keys to keep. Think of it this way:

You have a closet full of clothes. But this closet is really disorganized and you really want to organize the closet so that you can find your clothes much faster. So, you get someone else to clean up your closet. That someone else, doesn’t know who you are, what size clothes fit you best and what clothes you’d like to keep or what clothes you’d like to get rid of. Is it possible for that person to make your closet all neat and tidy? Not likely.

It is possible for the person to organize the closet, and get rid of clothes that are ripped and are out of fashion. But will that really guarantee that you can find the clothes that you want? Not really.

Registry cleaners work the same way. They get rid of keys that THEY think are of no use to the computer and try to optimize the registry. But that’s not really what the system wants. So, it’s impossible for you to buy or use a free registry cleaner and hope that your system will become faster.

Ok, so how can you really clean up your registry?

The truth is, you can’t really clean up your registry. Once you add information to the registry, it’s in there. There’s no way of getting rid of only the unnecessary information to keep the computer running smoothly. So if you uninstall an application and its registry information is left behind in the registry, most of it will remain in there… forever. Until you reinstall the whole operating system.

Therefore, the best way to keep a clean registry is -

1. Start off with a clean slate – reinstall the operating system all over again and start anew.

2. Keep it clean - If you can’t start off fresh with a new install at least don’t install any unnecessary applications that you know you’ll only use once. Just try to stay away from those applications. That’s the only sure fire way of keeping a clean registry.

Wait, so if I can’t use registry cleaners to keep my system fast, how can I make it fast?

Well, just because I’ve said here that you shouldn’t really use registry cleaners, it doesn’t mean that you can’t make your computer faster using other ways. There are many other sure fire ways to make your computer faster, that I’ve also mentioned in this blog several times. 5 ways to speed up Windows should be the place for you to start if you really want to speed up windows without messing it up.

Backing up and restoring your Windows Registry

0 Comments

Well, it seems like I should have written this post a long time ago, before I published posts like:

10 Registry Hacks to Make Windows Faster, Free!

Make Microsoft Windows XP Passwords more secure

Enable/Disable low disk space error message in Windows

Free up disk space and get rid of junk on your PC

5 steps make Windows XP faster in 2 mins FREE!

A note on why you should back up

The registry in windows is like a set of configurable commands that tells the operating system (In this case Windows) what to do. As an administrator, you can ‘hack your registry’ by modifying these set of instructions to the operating system. However, you can also screw up the operating system because of ‘improper’ instructions. Therefore, its important to back up the set of instructions (or registry keys) to ensure that you can always restore them if you accidently change something. To read more about how to back up and why you should back up.. read on!

So, How do you back up your registry?

It seems as though when I say ‘BACK UP YOUR REGISTRY’ in a post, people are still unsure of how they could really back up their registry. Especially when I read comments like this one. Nevertheless, once you know how to back up your whole registry, reverting any changes made to it should be really easy.

First, in order to back up your registry, you have to open regedit. It’s short for registry editor. To do that:

  1. Click on the start button and click on Run or simply press Windows Flag Key + R key together. This will open up the Run window (you might have to accept a UAC prompt to continue)
  2. In the run box that pops up type in regedit like shown below
  3.  image
  4. Then when the Registy Editor opens, click on File > Export,,, 
  5. Type in a file name (I suggest you give it a date or a identifiable name.. like ‘BeforeRegistryHack-Dec11’ or something similar so you know the file that you’d have to use to restore your registry (more about how to restore your registry below). I recommend that you select All for most back-ups. But if you want to only restore a ‘part’ of the registry or only the keys that you are going to edit – choose Selected Branch. Of course, if you choose selected branch, you’ll have to navigate to that branch first by using the sidebar on the Reg edit window and then click File > Export….
  6. image
  7. Click on Save to export your file,
  8. That’s it, you’ve just backed up your registry!

Restoring your backed up registry

How will you know when it’s time for restoring the backed up entries? Believe me, you’re system will refuse to do things correctly, crash all the time, slow down tremendously and might even start hanging all the time as well. You’ll certainly know when the registry entries are incorrect , because your system will start showing the symptoms above and start acting up right after you make a change to the registry. But no worries. Restoring your keys is even simpler.

  1. First, find the file that you’ve hopefully saved before making the change.
  2. Double click on it.
  3. Say yes to the prompt that appears when Windows asks you if you really want to add the stuff to the registry.
  4. Reboot your computer.

That’s it. Windows will now restore everything in the registry to how it was when you made the back up.

Monday, 13 October 2008

10 Registry Hacks to Make Windows Faster, Free!

7 Comments

Okay, so here are some registry hacks that you can use to make windows faster. A word of caution though, I’ve used these hacks and they seem to be fine, and they seem to cause no repercussions whatsoever on Windows XP, but nonetheless if you use your Windows XP machine as your primary machine, I wouldn’t use this on that machine. Nonetheless, Here they are:

How to use these registry Hacks:

Again, if you don’t know how to use these registry hacks, then you probably shouldn’t be using them. Please back up your registry first by reading this article!!! If you’re determined to use then then this is how you do it: (obviously you'd want to back up your computer first.. I take no responsibility if you manage to "bork it" =)

  1. Copy the code below. The “code” below contains modifications that you’re going to be implementing into the registry to tweak certain features of the operating system in an effort to make it faster
  2. Open a new notepad file (the cool way to open notepad is pressing the Windows key + R key and typing in “Notepad” in the box that pops up and pressing enter… just thought I’d kinda point it out to you)
  3. Paste the code
  4. Save the file as “Hacks.reg” (type it with quotes in the notepad save as box in your desktop
  5. Double click the file to add the keys to your registry
  6. Delete the file as required

OK, so here are the registry keys modifications that you’d want to copy:

So as you can see, modifications are made primarily to the FileSystem, Boot Configs, Shutdown Sequence, Start Menu Delay. Use it wisely!

Saturday, 3 May 2008

Enable/Disable low disk space error message in Windows

0 Comments
Are you tired of Windows XP or may be even Vista asking you over and over again to free up space on your hard disk drive? Then you can either do one of two things, clean up the junk on your computer or disable the message that pops-up at the most inopportune time altogether. This article deals with the latter, if you want to clear unnecessary files that you computer doesn't really need then refer to the remove junk from your PC post.

The most critical fact that you need to keep in mind is that what you are about to play around with is a very powerful tool. This article tells you how to back up your windows registry. Keep in mind that one wrong click in the Windows registry or even a little typo can render your system incaple of even starting up. So BACK UP THE REGISTRY!.

Oh and you'll need an account with administrator privileges in order to do the following:
  1. Log in with your administrator account
  2. Press the Windows Key along with the R letter key on your keyboard. Alternatively you can click on Start and click Run.
  3. Type in Regedit in the box that opens
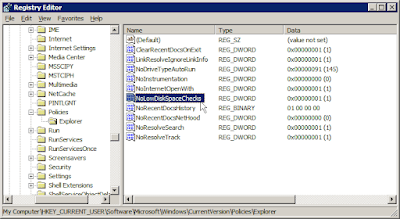
  4. Using the column on the left hand side click on the little plus sign to the left of HKEY_CURRENT_USER, then Software, followed by Microsoft (you'll have to scroll down a little bit) > Windows > Current Version > Policies> Explorer
  5. Double click on NoLowDiskSpaceChecks
  6. If low disk space checking is enabled, then the value in the box that pops up will be 1. Change this value to 0 and click OK.
  7. To enable the option again, go back to the same area listed in step 4 double click NoLowDiskSpaceChecks and click ok.
At this point your screen should look something like this:

If it does then go ahead and restart your computer. Once you restart, say bye bye to low disk space errors! But remember, windows will function a whole lot better if you get rid of the junk on your PC.