Showing posts with label tutorials. Show all posts

Saturday, 27 June 2009

Use Problem Recorder to Write Tutorials For Windows 7

2 Comments

Windows 7 has a great new feature called ‘Problem Steps Recorder’. It’s main purpose was, of course, to record the steps taken by the user to reproduce the problem so that someone else could see what the user is doing and help them out, especially through the get help from a friend feature.

image

However, another use for the feature is that one can use the ‘Record Steps to Reproduce a problem’ feature to record steps to make a tutorial! This is because what windows essentially does is makes note of everything the user clicks on as well as takes a screenshot of the desktop and places it in the HTML file as shown below. So it is somewhat better than a plain text tutorial and almost as good as a screencast.

image

So, all you need to do is replace the words ‘Problem’ in the file with a blank (a simple Find and Replace in the HTML should take care of that) and get rid of the timestamp and additional information that the problem recorder tool adds. Plus, if you have multiple desktops, you’re probably going to want to turn off the extended desktop, or else Windows will take a screenshot of that too like it did on my desktop.

To start using problem recorder simply search in the start menu for ‘Record steps to’ and you should see an entry to open problem recorder. Alternatively, you can also search for Problem Recorder/Problem Steps Recorder and click on the ‘Record steps to reproduce a problem’ when it opens.

image

Finally, just click Start Recording to start recording all the steps and the screenshots.

I can’t wait to use this new feature to record the steps to extremely cool (or at least I”m hoping I can do something extremely cool in Windows 7) things in Windows 7!

Saturday, 22 September 2007

How to find out if a .exe process is spyware or virus

2 Comments
Windows XP has thousands and thousands of .exe files, and usually a lot of those executables are running at any given time. But are all of those .exe files legit or are they spyware/malware/viruses that are bad for your computer... I recommend you follow these instructions

First get the usual spyware finding stuff (if you don't have it already - DOWNLOAD IT!) like:
  1. Spybot Search and Destroy
  2. AdAware (the free version works fine...)
  3. Windows Defender

Any one or more (more = better) of the programs listed below should be downloaded and run in order to search for any viruses. If the programs above find something then bingo! You've found the culprit! If not you'll have to do more digging....

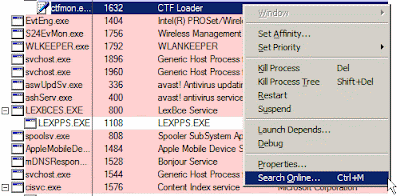
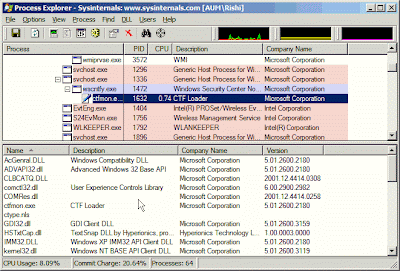
Download Process Explorer from Microsoft's website and unzip the stuff and open up procexp.exe. There look for the .EXE file that you had your doubts about and click on the entry corresponding that bears the name of the executable. If you don't know what that entry means just right click on it and click on 'Search Online...'

Now it's time time to see if there are any suspicious DLLs associated with it. So just press Ctrl+L and then Ctrl + D to take a look at all the DLLs that don't have 'Microsoft Corporation' under the company name. If you aren't sure about the DLL then you'll have to search for it online and see what you get.

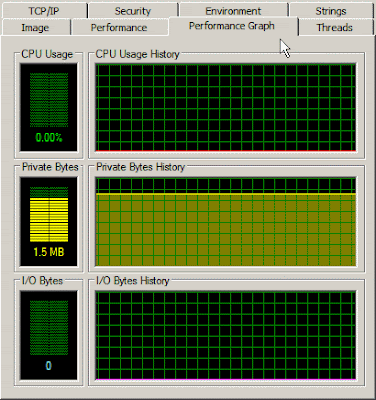
You'll also want to double click on the process, go to the 'Performance Graph tab' and see how much memory it takes up. It its taking too much memory or hogging up all the resources in your computer, then its probably a virus and should be dealt with accordingly.

If it doesn't show any of the symptoms mentioned above then it's probably supposed to be there, so just let it be there. Remember to run AntiVirus and spyware checks all the time though, because only those checks will tell you if something is bad or not.

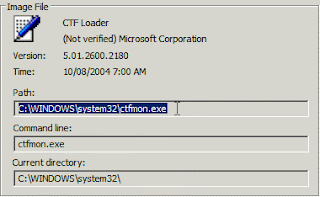
Another tip that I can offer is to use your AntiVirus scanner to scan the specific .exe file you are suspicious about. To figure out where the .exe file is stored on your computer - double click the process in Process Explorer > Under the 'Image' tab you should see the 'Path:' box which is going to tell you where the .exe file is stored. Just point your AntiVirus to that location so that it can figure out if the file is a virus or not.


If you find anything suspicious using the methods above (yes, using the methods above is a requirement) then please post about it in the comments. If you need help in figuring out if a process is malicious, feel free to email me, and I'll try to help.

Follow cricket scores online for free

1 Comments
Here's a tip for all my brown buddies out there with a slower internet connection. It's not as exiting as watching free cricket online, but its just as good to be able to follow the scores online.


It's pretty simple actually. Whenever a cricket game is going on, all you need to do is head on over to http://www.cricinfo.com/ and then just click the live scorecard link under the title of the game.
TipIf you want to a quick way to find out scores, just type cricket [name of the team] into Google. Of course, you'll have to replace '[name of team]' with the name of the team you want to follow. Example: cricket India. This will show you the score of the latest game india played.


For every live game that's going, it's going to show a link where you can access the live scorecard. Simply click on that link and the scorecard should open up.

By default it just shows a basic scorecard. I on the other hand prefer the full score card, so too might want to click on the full scorecard link in order to see the full scorecard. All scorecards refresh automatically, so there is not need to keep clicking refresh, unless you have ADHD or something.

And there you have it. - instant updatification. If you have high speed internet though, you might want to watch the game online, instead of just staring at the scores.

How to watch cricket online for free

0 Comments
I have a confession to make - I'm addicted to cricket. I pretty much can't live without watching cricket matches (especially if India and/or Pakistan is playing). So if you are wondering how you can watch cricket online for free, here's how you can watch LIVE online cricket. All you need is a passion for cricket, a internet connection (hi-speed preferably) and of course a computer that can handle live streaming video. (Note: If you don't have a high speed connection or a powerful connection - you might want to just stick to watching cricket scores online.. which is almost as exiting...)

Step 1

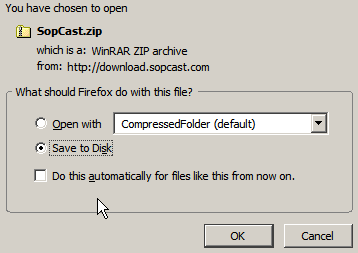
Download SopCast from SopCast.org. You'll most likely need this because it is necessary for most live broadcasting stuff. It works in the P2P style of bittorrent, so as you're downloading, you're also sharing it to others.
Step 2

Open IE (yes you'll need IE for getting some Active X controls) and go to a website that has sopcast embedded players in it. Here are some of them if you don't know any already:
Step 3

Click on the Yellow bar on the top to install the ActiveX control. You might have to click on the Play button (shown below) in order for the yellow ActiveX bar to come up. Once the pop up box comes up, click Install.
Step 4

Once the ActiveX control is installed, the video players on the website should automatically start. If not, just scroll down to one of the players (if you're looking to watch Twenty20 cricket its the last one - normal 4:3 ratio OR first one -widescreen).

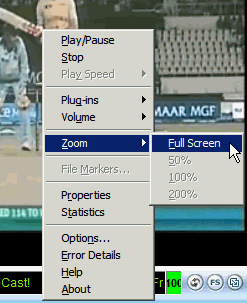
Then simply just click on the play button and wait till it loads. Once it loads you can also right click on the player Zoom > Full Screen, if you want to enjoy your game full screen. The quality won't be excellent but it'll be quite good.

Step 5

Cheer for your team, and have fun. Yes, this step is the most important one, so make sure you follow this step =) !

Now all you can do is hope your team wins, and hope that you don't punch the monitor if they don't.

Enjoy! And if you find any other websites where you can watch live cricket, just e-mail me (the link's at the top of the sidebar) or leave a comment!

Friday, 14 September 2007

Stop Internet Explorer from crashing

5 Comments
If you've ever experienced IE crashing.. you know its not a good thing. Here's how you can stop the famous Internet Explorer from crashing over and over..

If you have the latest version of IE and know that you shouldn’t be using IE all the time, please skip to the How to fix Internet Explorer section I apologize for the stuff about Firefox that you might already know…

First off, you really shouldn’t be using Internet Explorer 6 or even 7 a lot. Why you ask? Because it is less secure, slower and outdated, especially if you’re using the older version of Internet Explorer, IE Version 6.

I highly recommend you get Firefox... because its better go check it out!

Use it as your primary browser and only use IE 7 (that’s the latest version) only when needed. However, sometimes you might need to use Internet Explorer for things such as Microsoft Updates.

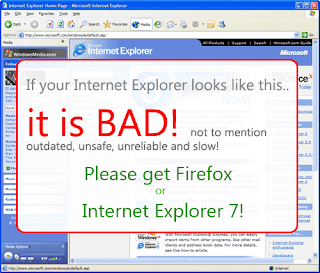
If you window looks like the picture below. Don’t even bother reading the article… unless you upgrade to Firefox first because it is secure, faster, and better!

Internet Explorer 6 is a really old browser, which was designed many moons ago. This only means that you will leaving your computer wide open so that viruses/spyware/credit card number stealing thieves/bad stuff can come and take advantage of it. If your browser looks like the picture below...

Please go to Microsoft and download Internet Explorer 7. You have no reason not to!

Ok, so once you know you have IE 7, this is what you normally need to do to stop crashes, especially if you get the sysfader.exe error occured problem. You need to have administrator privileges to do this. Or else you’ll not be able to open the Internet Options window.

Step 1
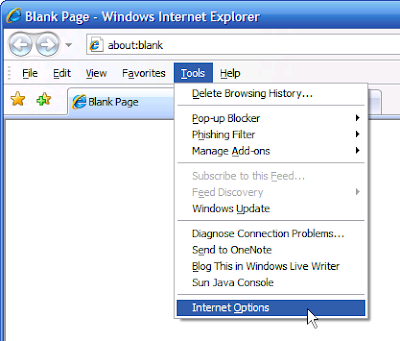
Press the ‘Alt’ key on your keyboard so that you can see the menu bar. Click on 'Tools', then click on ‘Internet Options…’.

Step 2
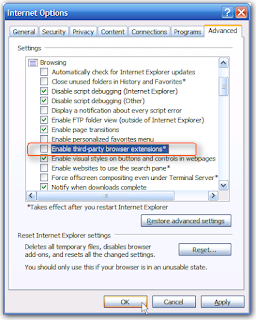
In the window that pops up, go to the ‘Advanced Tab’. Scroll down to where it says ‘Browsing’.

Step 3

Uncheck the check box beside the phrase that says ‘Enable third-party browser extensions’.


Click on OK and restart Internet Explorer.

This, in most cases this should stop Internet Explorer from crashing due to other extensions you might have installed. If in case you are getting a sysfader.exe error that should stop as well. However, this might not sure all the problems that you have with Internet explorer if other settings (such as cookies) were previously messed around with.

In that case, please try resetting the Internet Explorer settings. Click on
Internet Options again (please see step 1 above and follow those steps first before reading more…), then go to the advanced tab again, and this time click on the reset button. Click OK and restart Internet explorer.
TIP If you constantly get sysfader.exe errors with IE, please take a look at the sysfader.exe error page. (link opens in a new window)

Also, please keep in mind that many crashes might also be caused due to malware, spyware, viruses and other bad stuff that can be on your computer. It is highly recommended that you get rid of all malware on your computer that might be causing the crashes. More on that stuff coming soon...

Saturday, 20 May 2006

How to fix your iPod Shuffle

21 Comments
The tips listed below were provided by Stephen Grandy (thanks!) in the comments section of the iPod shuffle problems part 2 post. Since this tip seems to be very useful, I advise you all you give it a try and try to get rid of the problem where iTunes or your computer does not recognize the shuffle.

Here are the instructions given below:
I have found a lot of problems with the IPOD Shuffle. The best way is to not charge it via the computer and get a cheap USB Adapter. That is the first thing to do.

The second part is if you have any problems with your IPOD then
open it as a hard drive in windows, providing it is detected. Delete the IPOD Control Directory.

Now you need to get the following file: http://shuffle-db.sourceforge.net/
it may be in zip format so make sure you know about this. You may also need Python Programming Language that is free. Copy the program to your shuffle. Now copy the files over as you would any hard drive mp3 etc drag and drop and run this nifty program it will rebuild the database.

Put your shuffle in and itunes will see it as a new shuffle and ask what you want to name it etc. Name it whatever you want and then you will go your IPOD Control Directory Back. Now simply run rebuild and it will rebuild the files database.

Your iPOD Shuffle should now work.

PS: This is the only method I have known to work. I have tried all other kinds of Methods and they have resulted in nothing.

If you want to spend cash then a nice program is Anipod. But if you don't want to fork out over 20 dollars then my Method works and works well.

Steve
Thanks Steve! I'm sure this is going to help many out there who don't know in which direction to go. However I must warn users that this might void your warranty therefore, please use only if your support period is over etc.

You might also want to take a look at iPod shuffle problems part 1 and part 2 as well as unplug your ipod properly and stop the orange/green lights posts, how to use iPod and iTunes post or other posts that are mentioned. Sadly, there are so many things you can do to fix your iPod =( !

Sunday, 22 January 2006

Put an end to that iPod problem

0 Comments
Today I was browsing around the net and I came across one of the forums at iLounge that talks about the iPod Shuffle problems and what to do if it can't be updated or isn't recognised in iTunes and so on.

Try and see if this works for you hopefully it's going to. Here's what the other people said...

EfilsGod it worked!!!! thank you thank you thank you... MAN!!! Huge thanks!!! Finally i can use iTunes!!! and so on...

So just go and read it!!!!! If your iPod shuffle or any other kind of iPod is giving you problems, for example it isn't recognised by iTunes or your PC and you can't update it and so on!

, , , , , , , , , , , , , ,

Tuesday, 3 January 2006

The iPod Shuffle Problem- Part 2

44 Comments
Many people seem to be having iPod Shuffle problems and I guess I'm not the only one and this is also a very useful post if you have iPod problems as well. This post is created for the people who needed help and said so in my previous post. If you haven't read my previous post called 'ipod Shuffle Problems?' then I suggest you read that right now!

Most of you have probably gone through the Apple iPod Support site. If you haven't done that yet then you might as well go through it now. The tips I give below are a mixture of my own tips and what the Apple support site has. You might also want to chat with a Apple Support Agent (24/7), which I higly reccomend... plus the funny thing is that they have this especially for iMac and iPod Shuffle customers. This makes me think, how much problems does the shuffle really have?!

How to solve 'My computer and iTunes don't detect my shuffle, I'm so tired of this thing' Problem:

Reset your iPod shuffle (My way...)


1. Turn over your iPod shuffle (keep it off)
2. Move the switch (the rectangular thing that turns your iPod shuffle on etc) down and wait for 5 seconds. Check if you are getting the green light on the back of your iPod, you will usually get if after 5 seconds.
3. Move it back up to off position wait for 5 secs
4. Then bring it back to on or shuffle position.

I think this way is going to work a little better, here's the original way (what Apple Recommends).

Check if iPodService.exe is running

1. Press Ctrl+Alt+Detele together to bring up Windows Task Manager
2. Go the Processes tab
3. Check if iPodService.exe is running- If it is running then your computer is allright.
4. If it isn't running then read Apple's full article over here...
Check if Safely Remove Hardware icon is there

1. In your system tray you should see a small 'Safely Remove Hardware' icon
2. Double click on it and check if you see iPod anywhere. If you see iPod anywhere this means that your PC is recognising that there is an iPod.

Download the latest iTunes... and make sure that you don't use anything else. If you don't want to use iTunes to put songs into you iPod then you can use other software as well. I'll write up a blog post on that as well.

Make sure you try it with all the USB ports on your computer. For example if your web-cam is using a usb port and has the same requirements of the Shuffle then remove the webcam and put your iPod in that port and check if it works.


How to solve 'The Ipod cannot be updated. An unknown error occurred (-36)' Problem:

Change your iPod shuffle Drive letter (I'm not sure if this helps but I'm putting it in here anyways if you are brave enough to try it out)- Your iPod needs to be plugged in...

1. Click Start
2. Click Control Panel
3. If you are in Classic View Click on Administration Tools
4. If you are in Category View Click on Performance and Maintenance and then on Administration Tools
5. Click Computer Management
6. Click Disk Management
7. Right click on ipod
8. Change the letter to something else

You might also want to read through what Apple has to say about this.
If you've tried all of the above, and are tired of your iPod having problems then make sure that you chat with a Apple Support Agent you can also call 1800-APL-CARE 'iBelieve'. If you bought your iPod shuffle recently and it isn't working and you've tried everything if possible just go and return it and get a better one.

If I haven't covered your problem then please write up a comment, and I'll add that solution to this post as well! Hopefully your iPod is going to work fine!

Please to read the iPod shuffle problems part 1 post as well as the stop the green and orange blinking lights error if that is your problem. You might also want to check out the fix your iPod shuffle post, just in case it might help you out.

Friday, 2 December 2005

How to use iTunes and iPod

4 Comments
iTunes is not the best of software when it comes to putting songs into your iPod. However this is the reccomended piece of software that you are supposed to use. So I'd rather use iTunes even though it is difficult to use rather than using other software (such as iPodderX for podcasts).

Since iTunes is so hard to use to put the songs that you want into your computer, I decided to write a tutorial on that!

You can also take a look at Apple's tutorial on how to use the iPod and iTunes (its 20 pages long!), but I think that my version of it is going to be much easier to understand! Image hosted by Photobucket.com

First make sure that you have properly downloaded/installed itunes. It is important that you install iTunes properly or else it might not work properly.

Then make sure you have some songs to upload. If you don't then you might want to read the following instructions on how to put songs onto itunes from your cd.

1. Open itunes
2. Put the CD in the Drive
3. Click on the "Import" button to the top right

This should now import all your songs into iTunes. Now, you have some songs to put into your iPod!

To put songs into your iPod all you do is...

1. First charge your iPod
2. Open iTunes (start > All programs > iTunes > iTunes | or just double click on the iTunes icon)
3. If it is the very first time you are putting songs into your iPod then it will ask you the name you want to give your iPod and so on, and if you want to autofill (automatically put songs into your iPod) your iPod or not.
4. If you had chosen Auto fill then iTunes will automatically put ALL the songs you have onto the iPod.
Note: If you have more songs that your iPod can hold then it will pick random songs for you.
5. When your iPod is plugged in you can select from where you want to put in your songs from (for example the "Library", or the "Podcasts" section or the "Top 25 Most Played" and so on)

Whenever your iPod is plugged in you can See an iPod and the name that you have given your iPod in the Source list. If the iPod is updating itself then this is going to be blink red. Which means, do not unplug your iPod. You will also see a message in the green area that tells you how much songs are uploaded and so on. It is also going to tell you when it is safe to disconnect.

Now iTunes will remember your settings and use them... however the only down side is that you can only alter the settings when your iPod is plugged in updating itself.

You can also change the settings when your iPod is plugged in. To do this...

1. Edit
2. Preferences
3. iPod Tab

Here you can select your preferences.

Note: If you delete a song from the play list then iTunes will automatically delete it from your iPod. Unless you select manually manage songs and playlists, iTunes will automatically sync the playlist and iPod.

Now, after you've finished doing this, it is time to start using your iPod. Here are the instructions on how to use the iPod shuffle!

1. Unplug your iPod. To unplug your ipod click on the eject button (a triange over a rectangle) beside your iPod in the source list. You might also want to right click on the safely remove hardware icon in your system tray and then click on safely remove usb device then click on iPod usb device. Then click on stop. When you get a message box saying that it is safe to remove your iPod just unplug your iPod
2. Push the slider down (on the back side of your iPod Shuffle)
Note: your battery light should come on and the green light should come on. If this doesn't happen your iPod might need some restoration. So, you might want to refer to this post.
3. JUST PRESS PLAY AND ENJOY!

The rest is just basic stuff! And hope this helps
Image hosted by Photobucket.com!


Technorati Tags: , , , , , , , , , , ,

Wednesday, 30 November 2005

iPod Shuffle problems?

104 Comments
ipodUpdate: I've put up another post reagarding this as well, so do tell me if that works for you, but read this post first though...

If your iPod shuffle isn't working properly then this is probably a very useful post for you.

The iPod shuffle usually will not have any problems, but sometimes if something goes wrong during the installation/charging etc for the first time, this can cause your iPod to become "unresponsive"!

Usually the problems that occur are firmware/software problems, as the hardware on the shuffle is pretty sturdy and chances are it isn't damaged unless you did something to it.

Howevering, curing this problem is really easy. All you need to do is restore the firmware. Read this post and I'll explain how to do this (but chances are you won't need to do this)

First you must remember that if you restore the firmware on the iPod shuffle to factory it is going to get rid of all your songs and you need to upload it again.

This is what you need to do to restore your iPod to factory settings...

1. Click on Start
2. Then click on All Programs
3. Then you should see something called "iPod" in the all programs menu if you've loaded all of the software properly
4. Hover your mouse over "iPod" and another menu should pop up. In that menu you need to select "iPod Updater".
5. After that click on "iPod Updater" again when the other menu pops up ("iPod Updater" should have a iPod icon beside it)

This is going to open iPod updater. Now all you do is plug in your iPod and click "Restore"!

iPod updater is automatically going to update the software in your iPod.

Congratulations, now you've finished updating your iPod all you need to do now is put in songs again in your iPod (after it is charged of course) and your iPod is ready to go!

If this still doens't cure your ipod problems then just leave a comment and I'll try to give more specific instructions on how to make your ipod work, so that you too can enjoy the sweet music on the go!

Also, make sure that you have the latest software, if you purchased your iPod a while ago, then it is reccomended that you get an update. Before, when iPods were first created.. you needed to update the firmware on them through the iPod Updater. However, now a days, all you need is iTunes, so make sure you get the newest version of iTunes from the Apple Site.

Please read my other post on how to unplug the iPod
(click here)
from your computer! If you fail to follow the instructions on this post, the music in your iPod may get corrupt, which also causes your shuffle to give the blinking orange and green lights error.
Also, you might want to take a look at part 2 of this post. How to fix your iPod shuffle (an alternative way suggested by a reader) or use the search function to find more posts about fixing your iPod shuffle.